Top Ten Tips for Better Holiday Photos
The holidays make for fantastic photo opportunities. Even the least photographically-inclined reach for a camera to do the annual group portrait. Use these tips to make great photos of Christmas, Hanukkah, or the mid-winter holiday of your preference. This year, you’ll come away from the holidays with the absolute best photographs you have ever created.
Compose Creatively and Move in Close
Whether you are photographing the symbolic subjects of the holidays or your friends and family, getting creative with your composition certainly cannot hurt. This means paying special attention to how you organize the various elements in each photo.There are two main concepts to keep in mind when composing the scene artistically:
- Off-center your main subject. Instead of placing your main subject in the center of the scene – with a lot of dead space around it – move your camera until this subject is off to the side. This works especially well if you can balance your main subject with something in the background, on the other side of the picture. For example, if you are photographing a beautiful candle, try placing it on the right with the Christmas tree (or an equivalent supporting element) blurred softly in the background on the left. This will result in a photo that both records the candle in all its beauty and does so in an artistic, creative way.
- Move in close. Especially when you center your subject but even when you off-center it, moving in close is the one thing that will make the biggest difference in the success of your picture-taking. The simple fact is the audiences are always more impressed when the subject is huge and impossible to miss. Therefore, you want your subject to fill the frame. Say you are photographing the candle mentioned above, but don’t have a Christmas tree (or its equivalent supporting element) in the background. In this case, you might want to instead move in as close as you can. Causing the entire frame to be filled with your subject will inevitably result in a photo that has true impact on your viewer.
| # 2 | For Better Family and Group Portraits The most important thing to keep in mind when photographing groups and families is this: you absolutely must take a lot of photos.There is often a great deal of pressure when photographing groups. People generally complain about having their picture taken and want the experience to be over quickly. They have been trained by bad portrait photographers in the past to hate both the process and the results. |
So it is your job to overcome these hurdles. You need to work quickly in order to get the job done within their limits of patience. And you need to keep the experience as fun and friendly as possible, so they remember it in a positive light.
Above both of these tasks, though, you need to get the absolute best photos you can. And more than anything else this means taking a large number of photos. Since there is always someone blinking or looking off to the side or facing another member of the group, having a large number of photos will give you the best chances of catching everyone looking their best.
| # 3 | Shoot First, Ask Questions Later Especially if your subject is a child opening a gift – or playing with a gift for the first time – you know that, within a split second, the scene can change. There is often just a few brief moments when that “magic spark” appears.That’s why it is so important to be fully prepared to capture that moment when it happens. Of course this means having your camera on hand and the batteries fully charged… After all, you can’t capture the moment if you don’t have your camera on you and ready to go.However, even more than having your camera on hand, this equates to being assertive with your picture-taking. Be ready to press that shutter button at a moment’s notice, anticipating when the magic spark will surface. If you have a digital camera that suffers from a bit of a delay when taking the picture, then you will have to become even more intuitive and skilled at anticipating the moment. |
Either way, shoot quickly and shoot often. Don’t be shy – getting a great photo of the right moment is rewarding and well worth the extra effort.
| # 4 | Don’t Use Flash Indoors The flip side to Tip #5 is to turn off your flash indoors, whenever you can possibly get away with it.The flash can be a real lifesaver, no doubt about it. This burst of artificial light can mean the difference between a decent photo and a totally blurry, unusable image.However, the light from flash units – especially from the tiny on-camera flash units found on most every camera – tend to produce harsh, flat, and cold light. This is rarely a complimentary way to illuminate your subject. |
If you are shooting indoors during the day, make your portraits with your subjects standing near a window or door instead of relying on the flash. Get between your subject and the window – in other words, don’t include the window in your composition, as this will throw off your exposure meter.
If you are shooting indoors at night, try to flood the room where you are photographing with as much light as you can – turn on whatever lamps you have at hand. This will help reduce those harsh, flashed-out subjects, as well as other problems like red-eye.
| # 5 | Use Flash Outdoors Most people think that using flash is synonymous with photographing indoors at night – at a Christmas party for example.However, flash need not be relegated to indoor, night photography. Flash can be a big help when it comes to shooting outdoors during the day. Even in bright sunlight, forcing your flash to fire can often mean the difference between a so-so snapshot and an eye-grabbing masterpiece.The reason is that this kind of bright day flash will fill in the shadows and even out harsh contrasts. |
Try it out… next time you are photographing friends or children outdoors, turn your flash on and see if it works for you.
| # 7 | Blur, Swirl, and Zoom Those Christmas Lights
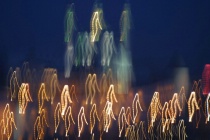
Tired of the same old Christmas tree photos? If you want to try something new, set your camera to a slower shutter speed – anywhere from 1/2 second to 2 or 4 full seconds. Then purposefully move the camera while taking the picture. The idea here is to intentionally blur the colorful Christmas lights… and in order to blur a stationary subject, you need a slow shutter speed and controlled camera movement.
For the zooming effect to look clean, you will want to mount your camera securely on a tripod to keep it from moving while you zoom in or out during the exposure. If you want to get even more creative, you can simple move the camera around while the shutter is open. For this technique, you can leave your tripod at home. That’s right… I said it… this is one of the few times I advise you to not use a tripod. |
| # 8 | Give the Gift of a Photograph Whether you are a last minute shopper or not, we have the perfect gift idea for you: a family photo.Parents and grandparents in particular love photos of the family and children as a holiday present.This is such a cherished present, we will be offering a few of the most helpful pointers for getting great portraits in the upcoming tips. In the meantime, pick out a nice frame, get some good inkjet paper if you shoot digital, and get ready to give a gift that, if done properly, can bring tears of joy to their eyes. |
| # 9 | Plan Ahead: Charge Batteries and Clear Cards or Buy Film The last thing you want to have happen is to get all set up for the family portrait or holiday photo to realize you forgot to charge the battery!In addition to making sure your batteries are charged (or you have replacements on hand), you will also want to make sure you have a place for your potential images to be recorded.If you shoot digital, offload and archive your images so you can free up space on your flash memory card. If you use a conventional, film-based camera, be sure you have an extra roll or two of film on hand. |
Here’s a bonus tip for you generous gift-givers out there: before wrapping up digital camera and film camera gifts, charge up the batteries and insert the memory card or film. This will make it all the more fun for the recipient to enjoy your nice gift – right out of the box!
Either way, being prepared will make those once-in-a-lifetime moments that much easier to capture.
| # 10 | Don’t Eat Yellow Snow; Don’t Photograph Blue Snow
If you go out photographing snowy out door scenes, most camera meters will be fooled into underexposing your picture. Instead of nice, bright white snow, a bluish cast will give your snow scene an extra cold feel (and an unnatural look) ©SomaMadhukar ©SomaMadhukar To remedy this, use your camera’s exposure compensation feature or a manual exposure mode to force an addition 1 to 2 stops of light to reach your film or CCD. If you have a point and shoot camera or a compact digicam, your camera may not feature manual exposure but it will likely have the exposure compensation option. Look for a little +1 or +2 symbol. If you have a film or digital SLR camera, you will likely have these +1 and +2 exposure compensation options as well as a manual exposure mode. |


Latrice
Right ont-his helped me sort things right out.